Showing posts with label Quilting. Show all posts

Thursday, August 31, 2017

Anchor's Aweigh - Lap Size


Hey everybody! Remember a million years ago when I used to blog and made this quilt?


(You can find that blog post here.)

One of my most frequently asked questions is how I did the math to scale down the pattern from a 90" x 96" quilt to a lap size of 60" x 64".

So, I've done up a little cheat sheet with the measurements for each row per the instructions in the original pattern, found here. You will still need the original pattern, just simply use the new measurements. If you come across something I missed, please let me know.

Click here to download the cheat sheet.

And because everything is better once you put a baby on it, here is our newest addition.


xo,
Jade

Tuesday, February 2, 2016

memories

To cut into the pieces and cloths that are left behind when a loved one passes away, is both terrifying and humbling. It isn't something I do often, but when I do, it is done with respect and the realization that a whole lot of trust is being directed my way.


This week, I cut into a stack of shirts and a couple pairs of pajama bottoms to (hopefully!) transform them into something that will keep the recipient warm and loved, in both the physical and emotional sense.

To break the clothing items down into usable squares, I cut along seam lines, after removing the collars and sleeves. For some shirts, I needed only to use the back section of the shirt, while for others, I used both the back and one shirt front.


The layout for this quilt is a simple nine patch block, that will be sashed in white. I cut out 4" squares from all the pieces. (To figure out how many pieces to cut, per garment, divide the number of nine squares, which in this case is 315 (35 x 9=  315), by the number of garments (in this case, 11). 


This is a quick mock up I did of the layout in Touchdraw.


This quilt is moving along quickly. I have almost finished constructing all the blocks, and plan to sash, using 2" strips soon. I'm hoping that the person I am making it is happy with the results. I can't wait to see the effect when it's all quilted and bound and washed.


Wednesday, January 20, 2016

round and round

When I joined the local Modern Quilt Guild in Vancouver, I was stunned by the sheer inspiration that one meeting could provide. The Round Robin project was introduced the following year and while I secretly wanted to join, it was too much of a commitment at that point in my life. Flash forward to the next years Round Robin - I decided to jump in.

It's such a novel concept. Begin by making the center block and journaling what direction you would like your round robin to take (ie. color scheme, low volumes, batiks, black and white, etc.), and bring it to the meeting. That meeting you take home a different quilt block in an anonymous numbered bag. Every month, the round robin coordinator instructs the participants on the theme that month (for example, curves, triangles, improv...) and how many sides to add on to the quilt as well as what size to make the sides. Every month, you switch bags with another anonymous bag/project.

This was my starter block.
I really enjoyed the process, but I'm not going to lie. It seems I have a problem with procrastination. This comes as a big shock, I know. For some months, I found that my perpetual procrastination actually provided more inspiration as it forced me to be creative or use improvisational piecing, but as a rule I wouldn't recommend it.

This past week, I received my round robin back after it completed a year of rounds. I was just a teeny bit excited.


The amount of talent that went into this quilt is incredible. Every month is a so wonderful. This will definitely be a quilt that has hidden treasures, yet to be discovered, with each use.


These stars are SO awesome.


Color order makes me so happy.


My plan is to continue to add to it, side by side as though continuing the round robin, to make it bigger.


This one will not be lingering in the WIP list for long. I can't wait to get it completed so I can use it. Also, one day I'll remember to thread check BEFORE I take pictures. I just couldn't wait to share this with you.


This is definitely going to be my pick me up quilt. It's just so happy. Who wouldn't be happy snuggling under it??


Tuesday, January 12, 2016

a baby finish - Shimmer

I am still getting back into the swing of actually documenting my projects but I just had to share this particular one. Going though the pictures on my camera, I realized I have quite the backlog of projects to share.

Somehow, despite knowing for months (MONTHS) that a baby is about to join the family, somehow the baby quilts never get made until the month or week (or day??) before the shower. I have yet to figure out why this is, and I wish I could say that this was the time that was different. But, this quilt didn't get finished until 1:30 AM the morning before gifting. Oh well, next time will be different. :)

I really looked forward to making this quilt for my new niece. Her mum is a quilter friend too and we love a lot of the same colors, particularly red and aqua. I had a pull selected for her quilt long before I decided on the pattern. I kept waffling between Modern Vintage by Bonnie and Camille (in American Patchwork and Quilting) or something else. And then Alison Harris of Cluck Cluck Sew released her new pattern Shimmer. And I was sold.


The baby version consists of nine blocks which was perfect. The way the quilt is constructed, there are a lot of little corners that are cut off. I decided ahead of time that instead of just cutting them off and throwing them into my scrap bin, that I would bite the bullet and make them Half Square Triangles (HSTs) right off the bat. So for every seam I sewed that would involve the removal of triangles, I would sew a line a 1/2" away and then cut as normal. This made a generous pile of half-square triangles to trim and press but I knew that I would be more likely to use them this way than if I let them get lost in my scrap bins.


I used a Hello Darling pink strawberry print to back the quilt - I absolutely LOVE this print and wish I had a bolt of it.


For quilting, I fell back on my new favorite free motion quilting, swirls and hooks. It adds so much texture and I just love the effect.


Since time was of the essence, I machine bound this quilt with a lovely mint from Pat Sloans collection, whose name evades me at the moment.

While it was a bit of a gamble that I would finish this quilt in time, sometimes, that crazy self-inflicted pressure can brew the best ideas.


Case in point, not wanting to tear apart the closet to find gift wrap, I wrapped this quilt in tissue and then in a favorite and hard to find print from Aneela Hoey's Sherbet Pips line. Tie it with twine and call it a day. :) And since it's going to a quilter, I know they'll use it and there will be no waste. Win win.


I'll have more later this week on what became of all those little HSTs. Can't wait to share that project!


Tuesday, June 9, 2015

Foxy

Confession: While I have been extremely slack in the blogging department lately, my crafting and sewing and stashing have still been going strong. This whole working full time with three kids and trying to balance life with crafts and chores and family has been taking up pretty much all of my blogging time. But, if you happen to follow me on Instagram, you know I'm still crafting. I just don't have as long to document it. 

But I've been thinking lately that there are certain projects that I've completed that I really want to document properly, so I'm going back over the past few months and taking the time.

First up is my Baby Fancy Fox Quilt that I made for a friend over our winter months. If you haven't tried out this pattern by Eliabeth Hartman, you really need to. 

It's downright addictive.


I fell in love at first fox. I like how the pattern has different sizes of quilts and the cutting instructions allow for strips or pieces of scraps.
And because I'm me, I went scrappy in one of my favorite color schemes - aqua, pink and red. This color scheme just never gets old.


I like to cut out all of my pieces at once and then chain piece. For this quilt I added a row to the side and bottom to make the quilt slightly bigger for longer use by the baby.


I loved watching my little skulk of foxes grow. (Yes, I had to google that.)


It was absolutely necessary to add at least one fox with glasses. This was my first time doing this type of applique. I'm amazed that it turned out.


In typical me style, I left most of the project till the last minute because apparently that's what we do to build up momentum.

I used my current absolute favorite all over free motion technique of swirls and hooks and I am pretty sure this pattern will keep reappearing in future quilts. It's fast, it's flowy and its forgiving of errors.


The texture it gives is just amazing.

Since this was a gift and I fell so hard for for the pattern, I'm pretty sure I still have one or two fox quilts for in my near future.


Thanks for reading along!
Till the next time...

xo
Jade

Linking up with Crazy Mom Quilts for Finish it Friday (in this case my finish is primarily that I BLOGGED!!)


Monday, February 9, 2015

Vintage Vibe - a book review


This week, I had the pleasure of my first ever book review. I jumped at the chance to review “Vintage Vibe” by Amber Johnson. 


As a lover of modern quilting, with a traditional foundation, I really loved the approach Vintage Vibe takes on quilting. It’s definitely “a little bit vintage, a little bit modern”. I especially loved the history of how Amber learned quilting with her grandmother “Gigi”. I can only imagine how precious these memories must be to Amber. 


There are 14 different patterns to choose from in a variety of sizes. And I fell in love with at least three quilt designs. There is also lots of quilting tips and instructions that would make this book appropriate even for one just learning the art of quilting.


One quilt in particular, Vintage Vibe, won me over at first glance. The elegant simplicity of the design really gives the quilter a chance to focus on the actual quilting effect. I know I definitely have some two tone solid quilts in my future.


I also really loved the bold elegance of this applique quilt (Growing Up). I’m not 100% confident with applique at this point in my quilting journey, but I hope to one day learn the skills needed to embrace this beautiful style of quilting.


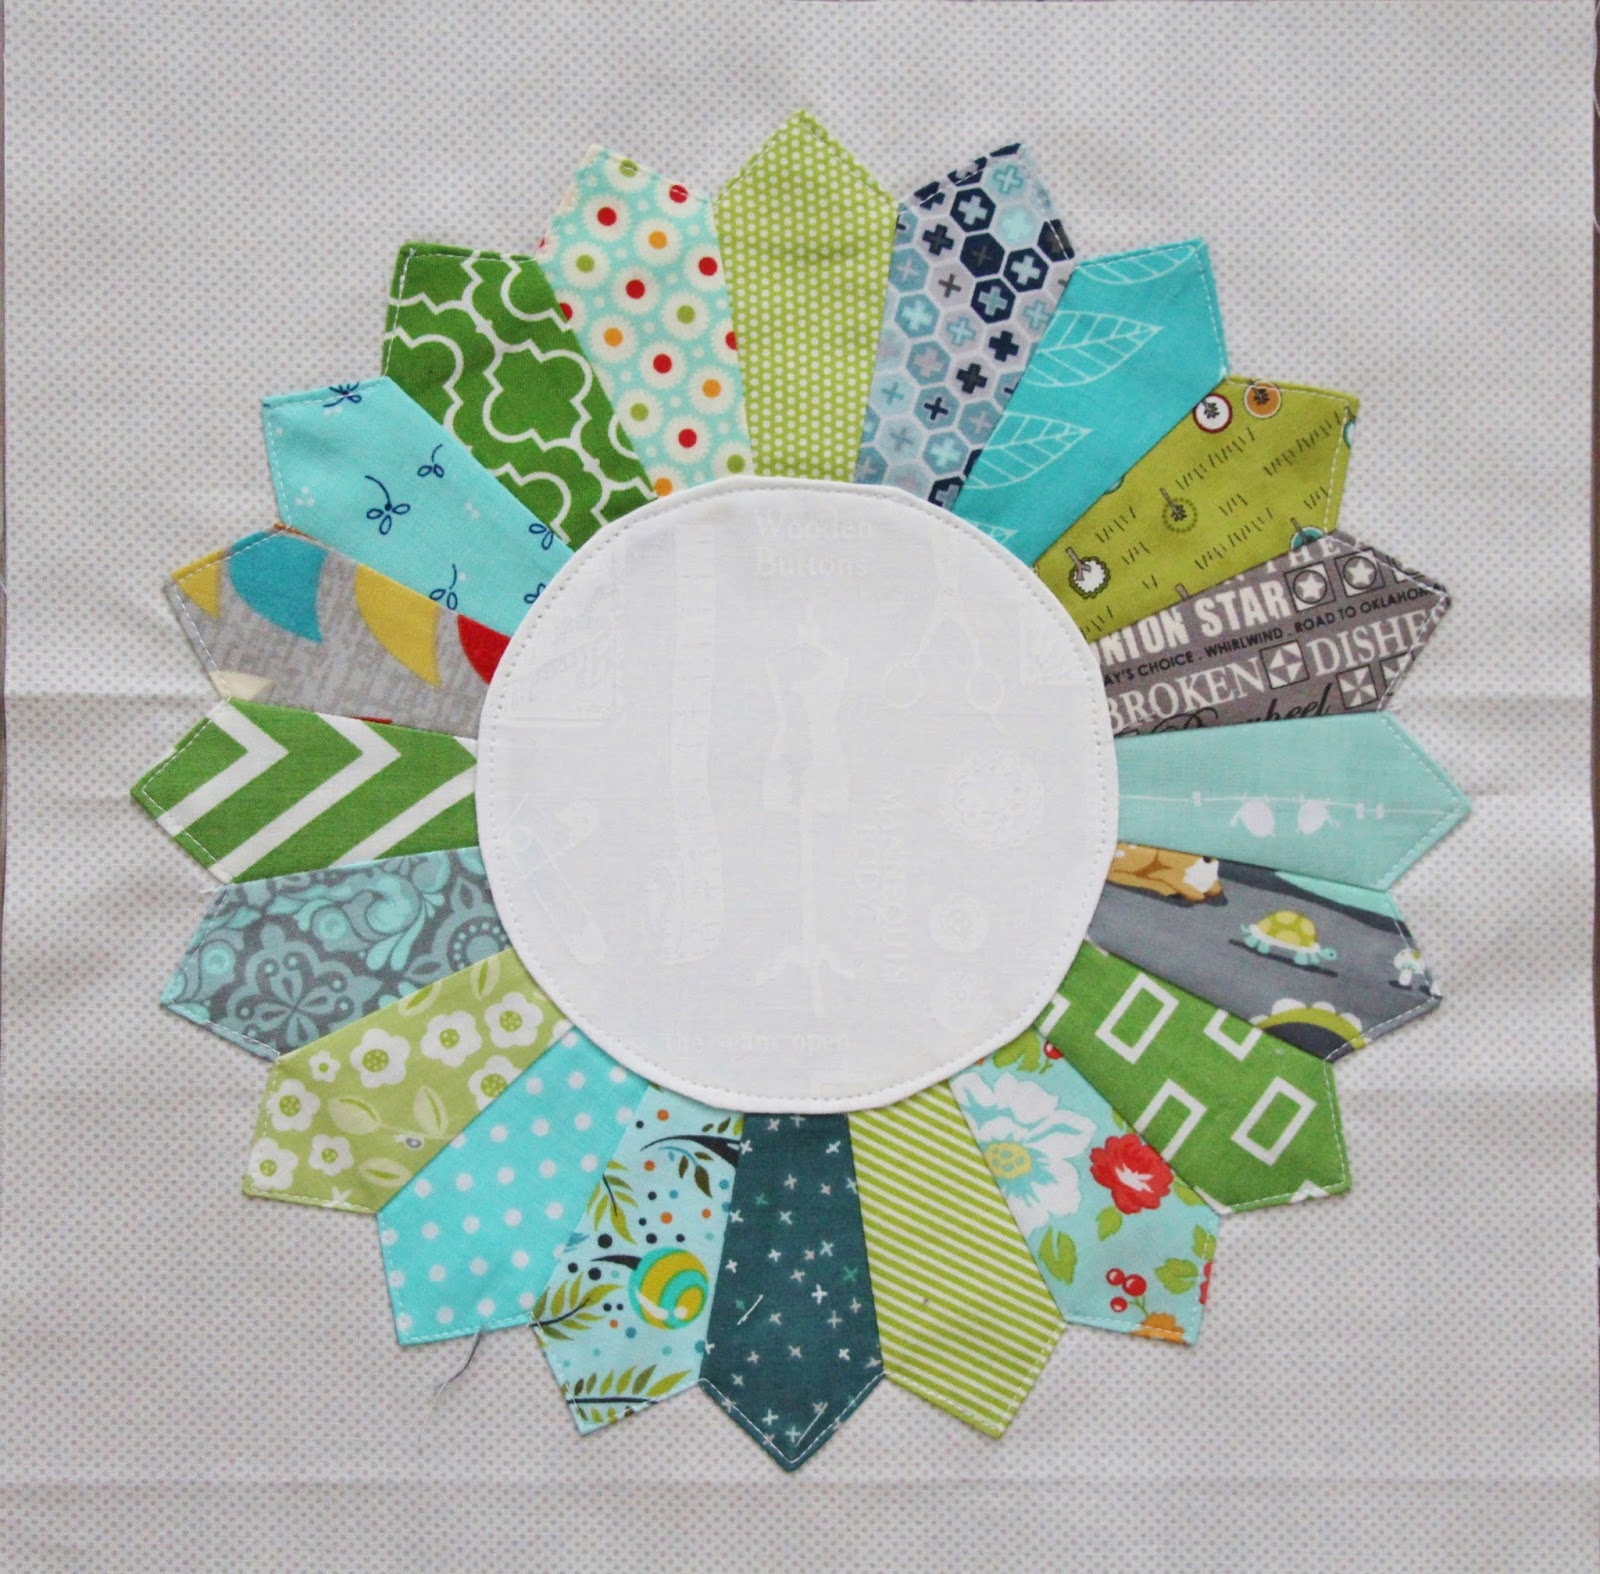
I chose to make a block from the Pretty Petals quilt pattern, which is a fun play on the traditional Dresden plate block. I found the size of the Dresden blades easy to sew. The pattern runs a bit on the generous size, so if you cut your fabrics for the blades as directed, you will have a bit of wiggle room to fussy cut if you choose. Personally, after cutting out the template provided, I realized that the Dresden plate wedge fits perfectly on a 2.5 inch strip of fabric, of which I just happen to have a big bin – precut and sorted by color. This was a really quick project for me.
(As a side note, I wish I had remembered that the circle template does not include the seam allowance, but I managed to make it work, just barely, with what I had cut out.)


This block took me about an hour, start to finish. (I plan on using it in a little special project coming up…)

All in all, this was a great read, with a good variety patterns and fun techniques. I look forward to playing with several of the patterns in the future.

Happy reading!


Note: All photo credit (except for the last) goes to photographer Brent Kane, with the permission of the Publisher Martingale.

Sunday, January 11, 2015

A Scrappy Norway Quilt

For Fall Quilt Market, Camille Roskelly of Simplify released a gorgeous quilt pattern called "Norway". I immediately added it to my "one day" list. I just love the blocks.

My initial plan had been to make it the way the pattern indicated, with each block dedicated to a fabric. But then I started thinking about a scrappy look... and that was it. Once I had it in my head, I couldn't stop thinking about it.

It all started with this block, to see if a scrappy look would work.


 And then there were two.


Then, nine.


And after a whole lot of rearranging, a quilt top!


And, since I'm not the type to let a quilt top linger, it was basted and quilted in record time (for me). I tried something new and practiced swirls with the periodic hook as a quilting design. Once I found the rhythm of it, I fell in love. It's my new favorite quilting pattern. And when the quilt has been washed and is all crinkley and gorgeous, the texture is phenomenal.

The weather hasn't cooperated lately, so I had to take what I could get for a photo shoot. I bundled up the three kids and took them for a cold, misty walk.

There is a definite advantage to having children available to hold quilts.


For the backing, I pieced yet another Norway block in grey and added two fabrics from Emmy Grace by Bari J. The darker fabric is voile and it makes for such a luscious quilt. I can't get over how soft and lightweight it is. This will be the perfect summer quilt. 


This is the last one, I promise. (By this point in the afternoon, the kids were hankering for hot chocolate and carrot cake.)


This has been such a fun quilt to make. I love the rainbow spectrum that I worked into it. I love that the top is made entirely of scraps. With such a grey and cold winter, a happy quilt is exactly what we needed.


Friday, May 16, 2014

concrete - a finished quilt

It's been a pretty incredible and busy week. This past weekend, my husband and I celebrated our 12th anniversary. My gift to him was his very own (first ever) quilt.

For the photo shoot, I decided to go back to where we took some of our wedding pictures.


It looks a bit different now, but still has a cool feel to it.


You can read more about the design process for this quilt in this post.


Be warned. (This post is pretty photo heavy.)

I really wanted to include my children in the making and documenting of this quilt. My oldest son was intstrumental in the basting and trimming process. And he's a pretty great photographer as well.

I decided to let them help me on a fun quilt photo shoot.


They had a blast. It was so windy under the overpass.


For the backing, I used this lovely Waterfront Park Birds in Flight print. It is so fantastic. I made three blocks of mini plus's to break up the print and add visual interest.


Four crocs photo-bombing. (I love this shot.)


I quilted it using a spiraling hexagon. I used one the hexagons from this Simply Style fabric as the point of origin.


As with any spiral quilting, the beginning was a difficult process as you push and pull most of your quilt through your machine over and over. Eventually, as you make your way from the epicenter, it gets easier.


It was too windy to get a really good flat picture, so I set up another shoot.

For binding I used a great 1/4 inch black and white stripe.


Our baby wanted in on the action...


He cannot help himself if there is a quilt on the floor.


All in all, having the whole family involved in this quilt process really added to all the love that went into every single stitch.


It's been washed, dried and crinkled. It kept him cool last night.


This post is for all the memories of years gone by, of a growing family, and of many, many years to come.


This week I'm doing something fun and entering this quilt into the Blogger's Quilt Festival. This is a first for me, and it's SO exciting.
AmysCreativeSide.com
Books
I am also linking up with Amanda Jean for finish it up Friday, Needle and Thread Thursday, and TGIFF.