Wednesday, November 9, 2016

Heartland Blog Tour - My Maker's Tote


I was extremely flattered to be asked to be part of the Heartland Blog Tour. It is being hosted by Amy Friend of During Quiet Time, and features this gorgeous collection by Pat Bravo. I have loved Art Gallery Fabrics since I came across them about 4 years ago. They had me at first touch. The hand of these cottons is awesome.


For this project, I chose to make a Maker's Tote. I've started one in the past but made the mistake of putting it down and figured this would give me the impetus to get both finished. We'll see how that goes.


If you've followed along on my crafting journey, you know I'm a major lover of pouches. All sorts of pouches and have conquered, for the most part, my fear of zippers.
This particular pouch was a learning experience to say the least. BUT, I finished it. I'm pretty sure I over-batted certain parts of it which lead to a battle between my fingers and the binding. My fingers won but there were a few casualties. :)

When I first saw this collection, I knew I had to include the owls. They are just too cute.


I love how large this pouch is, even as the smaller size. And the zipper is a separating zipper meaning the pouch can open completely, really opening up the space inside.


There are also 4 pockets on the inside, with different capacities for holding stuff. (And hold stuff they will - this is the perfect crafting/knitting bag.)


I opted out of making the zip pocket on the outside of the back of the pouch. (I admit, that style of zip is NOT my forte.)

Isn't the storage capacity awesome? By tonight this pouch will be loaded and ready to roll.


I love how these fabrics worked with the pouch - the large scale prints played perfectly with the large surfaces. Heartland fabrics are now available in stores.


For more great projects made out of these awesome prints, follow along with the blog tour, as outlined below.

November 7 Debbie
November 8 Jess and Charise (twice as good today!)
November 9 Jade
November 10 Amanda
November 11 Kari
November 14 Stephanie
November 15 Christopher
November 16 Kerry
November 17 Nichole
November 18 Krista

Thanks for reading along!
xx Jade


Tuesday, October 18, 2016

the happiest of rainbows

By this point in my blogging history, I have come to accept that I am not the most prolific of bloggers.

The past couple seasons have been very busy and very, well, encompassing.


A few blog posts back I updated you on my recent sad history of recurrent miscarriages. I felt like a follow up post was needed.


Last December, I put myself on the waiting list to be accepted to our BC Women's Hospital Recurrent Loss Clinic. There was a few months of waiting but I was ok with that. After an initial meet with the doctor in charge of our case, I received a few blood tests searching for possible conditions that could be causing the miscarriages. I later was on the receiving end of a hysteroscopy, which I would be happy to not have to repeat, EVER.
But all the tests came back with the same answer. Nothing was wrong. My thyroid is perfectly fine. I don't have any rare conditions that attack embryos, and since I already had three children, clearly, I am capable of having children.


I asked the doctors about my own personal theory as to why I was miscarrying and they basically said nothing could be proven and that new information comes out all the time.
I tried not to be disappointed that they weren't interested in the research, but I figured, I'd done the research, made the necessary changes, and maybe that would be enough.


Let me just say this first. I am not a doctor. This post isn't to give medical advice. It is just reflective of my discoveries and my own personal experience.
So here is how I ended up with the research that led me to believe that I could try for the final and fourth time to have our fourth baby.
When I switched family doctors, my new doctor ran a gamut of blood tests. This was done right after I had surgery the month after my third miscarriage. The blood test included testing for my B12 levels as well as my AST (aspartate aminotransferase) and ALT (alanine aminotransferase), and my thyroid function.
This was the first time someone tested me for B12, that I know of. My score was 248, with a healthy range being 156-698, according to this laboratory. While it wasn't super low, it was on the lower end of the spectrum and through research, I learned that Canada has a somewhat broad range, where as other countries have a much narrower range of what is an acceptable B12 range.
So I started researching links between "low" b12 and recurrent miscarrying. I found countless studies and research indicating a link. Simply put, from what I could determine, low B12 while pregnant could cause your body to abort the baby at about 5-6 weeks. While this wouldn't explain my first miscarriage (I saw a heart beat but the HCG levels were quite low for where the baby was in the pregnancy), it could DEFINITELY explain my second and third miscarriages. Both babies stopped developing at about 5-6 weeks. And throughout all THREE pregnancies, I was breast-feeding my son which further depletes vitamin stores, if not supplementing enough or correctly.
So, I beefed up my B12 intake with an oral methylcobalamin b12. My doctor retested me a month after my supplementing and it had already gone up from 248 to 419.


Fast forward 5-6 months later. During this time, I continued to take my vitamins, my iron and my B12 supplement and tried to generally become healthy again.
We were given the green light to try to conceive again. We waited until our anniversary celebration was over (the idea of being nauseous and exhausted while away was not appealing).


We were pregnant the next month. This pregnancy would be monitored by BC Women's Recurrent Loss Clinic. This meant I had several blood tests early in the pregnancy to make sure my HCG levels were doing what they should. And I would be able to have an ultrasound every two weeks from 6 weeks on. If I made it to twelve weeks, I would graduate from the clinic and move to regular prenatal care.


We were (VERY) cautiously optimistic. My pregnancy symptoms started before I even took a pregnancy test and worsened as I went along (all good things for sure). My kids, being the super curious type, immediately determined I was pregnant by the sudden occurrence of blood tests. They confronted us right away and I couldn't lie. :) Also, when I'm pregnant, I REALLY have no energy, so they would figure that out pretty quick.


So, when I was six weeks pregnant or so, we went in for our first ultrasound. To say I was terrified was an understatement. My hubby came with me (he really had zero choice in the matter - HA) and held my hand while the technician quickly assessed us.


While she lacked a certain warmth, one of her first sentences while scanning me was "Don't worry, I see a heart beat". For that alone, I was ready to leap off the table and hug her.
We got to see our tiny little nugget growing away with a beautiful round yolk sac. It looked like maybe we were going to actually have a baby. Up until this point, I didn't really believe it was possible.


I immediately felt better. This lasted for about a week until I started fretting that maybe something else would go wrong... When I saw the next ultrasound, surely THEN, I would believe we were actually having a baby.


Needless to say, this vacillating between being ecstatic and worried continued. After our final ultrasound with the Recurrent Loss Clinic, we were told we were graduating to regular prenatal care and that they would love it if we sent on a picture of our little baby when it was born in February. Having that vote of confidence meant so much.

Well, we are now 22 weeks pregnant, and our little blessing is a boy.


And NOW, I can begin knitting and sewing and getting ready to welcome our little baby into our family. To say he is loved would be a major understatement. Even as I write this, I can feel him rolling around and kicking me, and letting me know he is there and he is coming. I am so glad we tried "just once more".


Friday, February 12, 2016

another mini finish

It's February, and I cannot get over the rain at the moment. Its absolutely dumping buckets and I'm so grateful to be here and cozy in my warm little house.

I've mentioned before that I've been somewhat lax on posting my finished projects anywhere other than Instagram, so today I wanted to share something I made a little while ago. This was a custom made mini Sew Together bag for a lovely lady. (Original pattern can be found here, mini pattern conversion sheet here.)


When trying to make something specifically for someone, but someone I have never met personally, I usually use whatever tools I can find. I like to check out their Instragram account, or blogs and get a sense of their aesthetic. Is is minimalist, feminine, modern, rock, punk, cute or quaint? What is their favorite color? What projects have they been working on? What fabric designers do they use? All these little tidbits can influence the direction I take a project. Once I have a fabric pull, the client and I will go back and forth on choices until I'm set to begin construction.


This particular project was fun as I had never appliqued hexagons (hexies) to a project before. I didn't plan going in to do a grid quilting using multiple thread colors, but it's where the project led me. If you've never done this before, allowed yourself to be led by a project or a general feel for a project, I recommend it. It is very freeing to not let yourself be tied to preset constraints.


I love the arrow print we used on the side panels.


The binding was not my first choice, but in the end, it worked out better than what I had initially chosen and added a glow to the pouch. This essex linen background fabric remains to be a favorite of mine. It has so much depth.


 I'm pleased that the recipient likes it as much I as I do. It was definitely a fun project to X off my list.

In other news, maybe you've heard the buzz going around the creative world right now about a new book, called "Steal Like An Artist".

Steal Like An Artist cover

I was initially a bit put off by the title (how dare anyone imply we creatives steal!), but curiousity got the best of me. And boy was I glad it did. Go. Read.

IT'S. SO. GOOD. (You can find it here.)

And if you loved it as much as I did, read his next book, Show Your Work. (found here)

Show Your Work book cover

I read both these books in about 2-3 days. I could not put them down, and there were so many truth moments. It definitely changed the way I feel about the crafting world, Instagram, the blogging world and sharing our work as artists.

Let me know what you think - I'd love to hear your thoughts.


Linking to finish it Friday at Crazy Mom Quilts.


Tuesday, February 2, 2016

memories

To cut into the pieces and cloths that are left behind when a loved one passes away, is both terrifying and humbling. It isn't something I do often, but when I do, it is done with respect and the realization that a whole lot of trust is being directed my way.


This week, I cut into a stack of shirts and a couple pairs of pajama bottoms to (hopefully!) transform them into something that will keep the recipient warm and loved, in both the physical and emotional sense.

To break the clothing items down into usable squares, I cut along seam lines, after removing the collars and sleeves. For some shirts, I needed only to use the back section of the shirt, while for others, I used both the back and one shirt front.


The layout for this quilt is a simple nine patch block, that will be sashed in white. I cut out 4" squares from all the pieces. (To figure out how many pieces to cut, per garment, divide the number of nine squares, which in this case is 315 (35 x 9=  315), by the number of garments (in this case, 11). 


This is a quick mock up I did of the layout in Touchdraw.


This quilt is moving along quickly. I have almost finished constructing all the blocks, and plan to sash, using 2" strips soon. I'm hoping that the person I am making it is happy with the results. I can't wait to see the effect when it's all quilted and bound and washed.


Friday, January 29, 2016

hello darling!

I've been lucky enough to be able to make several "Sew Together" pouches the past year or so. I had no idea I had made so many until I started to tally them the other day - I think it's seven all together.
(Beware - they are addictive.)


This past week, I've been working on a special custom pouch for someone's daughter. The daughter loves Hello Darling (who doesn't) by Bonnie and Camille. And I just happened to have a bunch of squares left over from another upcoming project/WIP.


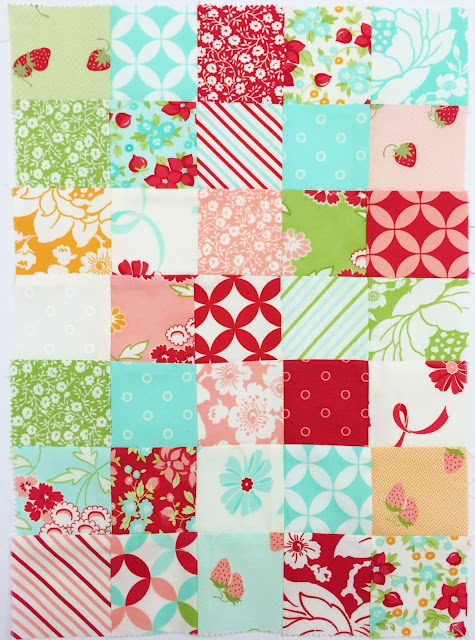
When making a patchwork exterior, I found that 2 1/2" squares (these are from a charm pack that I quartered) work perfectly. Seven rows of five squares are just about the perfect dimensions. If you are quilting it, wait till you have finished quilting before trimming. I found I only needed to trim about 1/8" off either side of the long edges and about 3/8" off the short edges. The exact amount, of course, will depend on the accuracy of your quarter inch seams.


For some reason, zippers just never get old. It's almost time to put another order in. Getting zippers in the mail ranks right up there with getting fabric in the mail.


I think a large part of what makes this pouch fun to make is the quantity of fabrics it uses. You can mix ranges and fabrics and colors and zippers and change the feel completely. It makes my color loving soul SO happy.


I used several Lecien fabric florals on the inside. They are just so gorgeous.


I really liked working with the person who requested this pouch - she had very specific opinions and choices in the zips and binding choices. And they really worked. Where I might have leaned to red in some cases, she leaned to aqua, and the overall effect is a very soothing palette with a splash of sunshine on the inside.


It feels so good to wrap this project up. The to-do list is getting shorter and shorter and I can't wait to fill it with some new goals and projects for 2016.

Linking with Crazy Mom Quilts for finish it Friday. Thanks for popping by!

Wednesday, January 20, 2016

round and round

When I joined the local Modern Quilt Guild in Vancouver, I was stunned by the sheer inspiration that one meeting could provide. The Round Robin project was introduced the following year and while I secretly wanted to join, it was too much of a commitment at that point in my life. Flash forward to the next years Round Robin - I decided to jump in.

It's such a novel concept. Begin by making the center block and journaling what direction you would like your round robin to take (ie. color scheme, low volumes, batiks, black and white, etc.), and bring it to the meeting. That meeting you take home a different quilt block in an anonymous numbered bag. Every month, the round robin coordinator instructs the participants on the theme that month (for example, curves, triangles, improv...) and how many sides to add on to the quilt as well as what size to make the sides. Every month, you switch bags with another anonymous bag/project.

This was my starter block.
I really enjoyed the process, but I'm not going to lie. It seems I have a problem with procrastination. This comes as a big shock, I know. For some months, I found that my perpetual procrastination actually provided more inspiration as it forced me to be creative or use improvisational piecing, but as a rule I wouldn't recommend it.

This past week, I received my round robin back after it completed a year of rounds. I was just a teeny bit excited.


The amount of talent that went into this quilt is incredible. Every month is a so wonderful. This will definitely be a quilt that has hidden treasures, yet to be discovered, with each use.


These stars are SO awesome.


Color order makes me so happy.


My plan is to continue to add to it, side by side as though continuing the round robin, to make it bigger.


This one will not be lingering in the WIP list for long. I can't wait to get it completed so I can use it. Also, one day I'll remember to thread check BEFORE I take pictures. I just couldn't wait to share this with you.


This is definitely going to be my pick me up quilt. It's just so happy. Who wouldn't be happy snuggling under it??


Friday, January 15, 2016

slow and steady wins the race


I've come to the conclusion that there is a fine line between scrap usage and insanity. This is a line I am willing to test, repeatedly.

In my last post, I shared a quilt I made for my baby niece. When I began making the blocks, I noticed that there are a lot of triangles that are cut off as waste. And being a scrappy quilter by nature, I just couldn't relegate them to my scrap bin, to never be found again, to become distorted or to be lost.


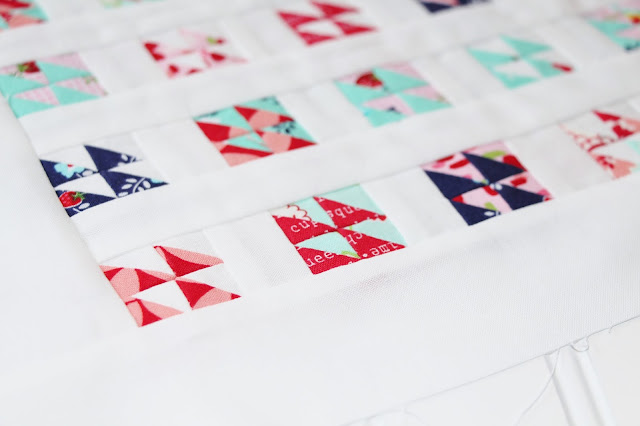
From the get go, I decided to stitch a second seam 1/2" away from the the first seam on the edge that was to be cut away. That way, when I cut off the parts that the block no longer needed, I would already have a tiny little half square triangle block, ready to be pressed, ironed and trimmed.

I found that while some blocks could handle being trimmed to 1 1/4", it was safer to trim them all to 1". Each Shimmer block generated 24 half square triangles. And there were nine blocks total in the quilt I made, so if I just kept it up and didn't flake on this, by the end I would have as many as 216 HSTs. The thought was really exciting.

(Mini anything has always appealed and I have been itching to make a mini for my wall.)


While I stitched through my niece's quilt, I kept pondering the layout. To sash or not to sash? Single HSTs or grouped HSTs? If grouped, how big a group? If sashed, how big? Round and round I went.


I trimmed all my HSTs using my Bloc Loc ruler and about half way through, realized I could do multiple (as many as 5), at a time in one layout. (See my instagram account if interested in a video of this.) This definitely saved time and I'll be using this procedure again for sure.


Eventually, I decided on groupings of four HSTs of the same type. After sorting all my HSTs, I realized that regardless of the color of the HST, each sorted group had an amount based on a multiple of 4. And I wanted to use up all my little hard earned blocks, so groups of 4 was the way to go.


Once I decided that, I made a quick plan of doing 54 groups of 4 blocks (216 total), which would work out to a nice layout of 6 blocks by 9 blocks.


I decided on using a sashing of 1 1/4" width for in between the blocks. Each HST finished at 1/2" square, making the 4 patch block 1" square finished. The sashing between would finish at 3/4". I did an outer sashing of 2" unfinished.

I am beyond thrilled that this turned out EXACTLY as I hoped.

Now to decide on quilting...

Linking up with Crazy Mom Quilts for it finish it up Friday.


Tuesday, January 12, 2016

a baby finish - Shimmer

I am still getting back into the swing of actually documenting my projects but I just had to share this particular one. Going though the pictures on my camera, I realized I have quite the backlog of projects to share.

Somehow, despite knowing for months (MONTHS) that a baby is about to join the family, somehow the baby quilts never get made until the month or week (or day??) before the shower. I have yet to figure out why this is, and I wish I could say that this was the time that was different. But, this quilt didn't get finished until 1:30 AM the morning before gifting. Oh well, next time will be different. :)

I really looked forward to making this quilt for my new niece. Her mum is a quilter friend too and we love a lot of the same colors, particularly red and aqua. I had a pull selected for her quilt long before I decided on the pattern. I kept waffling between Modern Vintage by Bonnie and Camille (in American Patchwork and Quilting) or something else. And then Alison Harris of Cluck Cluck Sew released her new pattern Shimmer. And I was sold.


The baby version consists of nine blocks which was perfect. The way the quilt is constructed, there are a lot of little corners that are cut off. I decided ahead of time that instead of just cutting them off and throwing them into my scrap bin, that I would bite the bullet and make them Half Square Triangles (HSTs) right off the bat. So for every seam I sewed that would involve the removal of triangles, I would sew a line a 1/2" away and then cut as normal. This made a generous pile of half-square triangles to trim and press but I knew that I would be more likely to use them this way than if I let them get lost in my scrap bins.


I used a Hello Darling pink strawberry print to back the quilt - I absolutely LOVE this print and wish I had a bolt of it.


For quilting, I fell back on my new favorite free motion quilting, swirls and hooks. It adds so much texture and I just love the effect.


Since time was of the essence, I machine bound this quilt with a lovely mint from Pat Sloans collection, whose name evades me at the moment.

While it was a bit of a gamble that I would finish this quilt in time, sometimes, that crazy self-inflicted pressure can brew the best ideas.


Case in point, not wanting to tear apart the closet to find gift wrap, I wrapped this quilt in tissue and then in a favorite and hard to find print from Aneela Hoey's Sherbet Pips line. Tie it with twine and call it a day. :) And since it's going to a quilter, I know they'll use it and there will be no waste. Win win.


I'll have more later this week on what became of all those little HSTs. Can't wait to share that project!