Monday, September 8, 2014

carousel - Sewvivor - Challenge #3


I am SO thrilled to announce that I managed to squeak my way into round three of Sewvivor. This round, our challenge was hexies (hexagons). I have already made a quilt during Sewvivor, so I had initially planned on making something small, like a crafting tote. But the more I thought about it, the idea had less appeal, especially having just made a slightly epic (for me, and don't ask how long it took) tote. So, a quilt it was. I had someone really special in mind. I pulled a stack of fabrics, and waited for inspiration to strike.


I started searching for hexagon quilts, and then star hexagon quilts, looking for that perfect pattern. I couldn't find one pattern that was what I had in mind. But I did find an awesome quilt I really wanted to make, except the person that made it hand pieced it and it took three years. I had about one and a half weeks.


From what I can tell, this quilt design is almost always hand pieced. I've seen this design in the past, and somewhere in the back of my mind, I've thought that there must be a way to make this design machine piecing friendly. I'm happy to say, I've figured it out, come up with a design and absolutely love the result. Each star is encased in an outer frame which creates a large hexagon.


My best friend, and cousin, is the new owner of this quilt. Every single fabric, stitch, and color was chosen with her in mind. She is undoubtedly, always, the first to believe in me and my little creative dreams. I was waiting for the perfect quilt to make for her and this is it. It reminds me of our childhood summers spent together, family, and sunshine. And it's bright, and happy, just like her.


This quilt measures 68 x 76 inches and is constructed completely using diamonds. I love the vintage quality this design has, and I hope I conveyed that with my fabric choices. I used so many of my absolute favorites that had been carefully stashed away (hoarded).


For the backing, I used a couple prints from Heather Bailey's Up Parasol line. This just might be my favorite backing ever.


Together, my cousin and I, named this quilt Carousel, as to us, it evokes childhood and the spinning shape of old vintage carousels. 


After an amazing photoshoot with my cousin, and photography assistant extraordinaire, I sent the quilt home with her. It's already been washed, and loved and treasured. I couldn't be happier.


I want to thank, first and foremost, my family, both immediate and extended, that have put up with my slightly distracted state of mind the past few weeks. They've picked up where I've dropped things and been so patient. My kids have been amazingly encouraging. I love that the older two are old enough to know what is going on and are my little cheerleaders.

I want to thank Rach of Family Ever After, for graciously moderating and organizing such a fantastic challenge. It's been fun (and terrifying) to see the ways I've let it push me and grow creatively.

Lastly, and definitely not least, I want to thank you, my readers. You have voted for me, cheered me on, and through the wonder that is Instagram, helped me pick up the pieces when I completely fell apart in the middle of this challenge. You believed it me, and it made a difference. So, thank you.

If you would like to vote in this next challenge (and I promise there is only one more if I make it), you can at Family Ever After. I have my next challenge project work out should things pan out, but if they don't, and I go home this round, I couldn't be prouder of my project.

Have an awesome week friends!

Friday, August 29, 2014

a VMQG mini quilt swap

I finally managed to find a moment to blog about a recent finish. In between all the Sewvivor excitement, I have less than a week till I return to work, till school starts, and we are smack in the middle of house hunting. It's been a little wild and crazy over here. But, I digress.

A little while ago, our local VMGQ (Vancouver Modern Quilt Guild) decided to set up a mini quilt swap within our guild. Of course, I was all for it.

I was chosen to make a quilt for Amy Dame, a fabulously creative and incredibly talented person. I was a little bit (A LOT) nervous about what I would do. But in reading her questionnaire (you fill one out when you participate in a secret swap), I learned that she was obsessed with the churn dash block. Now, for no particular reason, I don't really like the churn dash. I find it a bit choppy or disjointed somehow. This year, there is a definite trend favoring "nested churn dash" blocks, where you have one block inside the next, inside the next and so on.

Always a sucker for a challenge, I figure what better way to challenge myself than taking an extremely traditional block that I don't like and change it to be something I would like, and modernize it.

So I made my own modern version of a nested churn dash, starting with a tiny little block, and setting it on point, like an economy block. Then I made a second churn dash around the edges, and set the whole thing on point again.


I chose to use colors Amy likes, jewel tones, etc. and tone on tone fabrics. But to make it even more modern, I off-set the colors so each churn had two colors. Set the whole thing on Moda Bella grey, add a couple borders to off set it even more, and you have a mini.
I did this within a DAY of receiving my recipients information. (And of course, feeling cocky, was sure that THIS would be the (one) thing that was finished in a timely manner.)


Initially I was going to hand quilt it, but then life happened and I started to feel it was the wrong decision for this particular mini. It needed more dense quilting to fill the negative spaces in a modern manner.


Fast forward to the day or two before we are to trade minis. And yes, there I am, ripping out my hand quilting, re-quilting it in a grid with some fun free motion pebbling.
I quilted it in a crossing grid, using a different color thread for each quadrant. I used white to pebble quilt the white spaces and left the actual churn dash un-quilted to allow it to pop and be the focus.

And of course, there I was, mere hours before handing it over, sitting by a creek, furiously binding, while simultaneously making sure my baby didn't drown. Skills, I tell you. (Because despite my crafty life, my children still expect to leave the house for fun excursions periodically. The nerve.)

So, I apologize for the lack of properly staged photos, but there you go. For some mysterious reason, fushia is practically impossible to photograph accurately. (My best friend and cousin was my model, and as she will probably kill me for posting this on my blog, I should say good bye now.)


There is something incredibly nerve racking about giving something to someone so talented (you should see the mini she made for another guild member!!!). But, she said she liked it. I'll believe her.

Linking up with Amanda Jean for finish it up Friday.
 

Monday, August 25, 2014

my hope tote - Sewvivor - Challenge #2

First off, I want to thank everyone for all their support and votes in the Sewvivor competition, Challenge 1. Because of you I made it through to round two!! Thank you SO much. You can read more about who else made it into the top ten here. (To vote for round two, click here.)

The second Sewvivor challenge is to make a quilted bag, any type, by personal design or someone else's pattern, and of any size. I waffled a bit on what type of bag to make but settled on designing my own perfect bag. I wanted to make something that I would use, that would be very practical, and as I am the worst packhorse, would be large enough to suite my needs.


So, I designed a bag that would be perfect for my impending return to work, post maternity leave. I've called it my "hope tote" as it will serve as a reminder that there is life after work, and that I can get through the next six months, after which I will hopefully return to my life as a stay at home mother with my babies. I LOVE color, and decided to use only fabrics that made me happy, and instead of keeping them on the shelf, I used my absolute favorite fabrics.


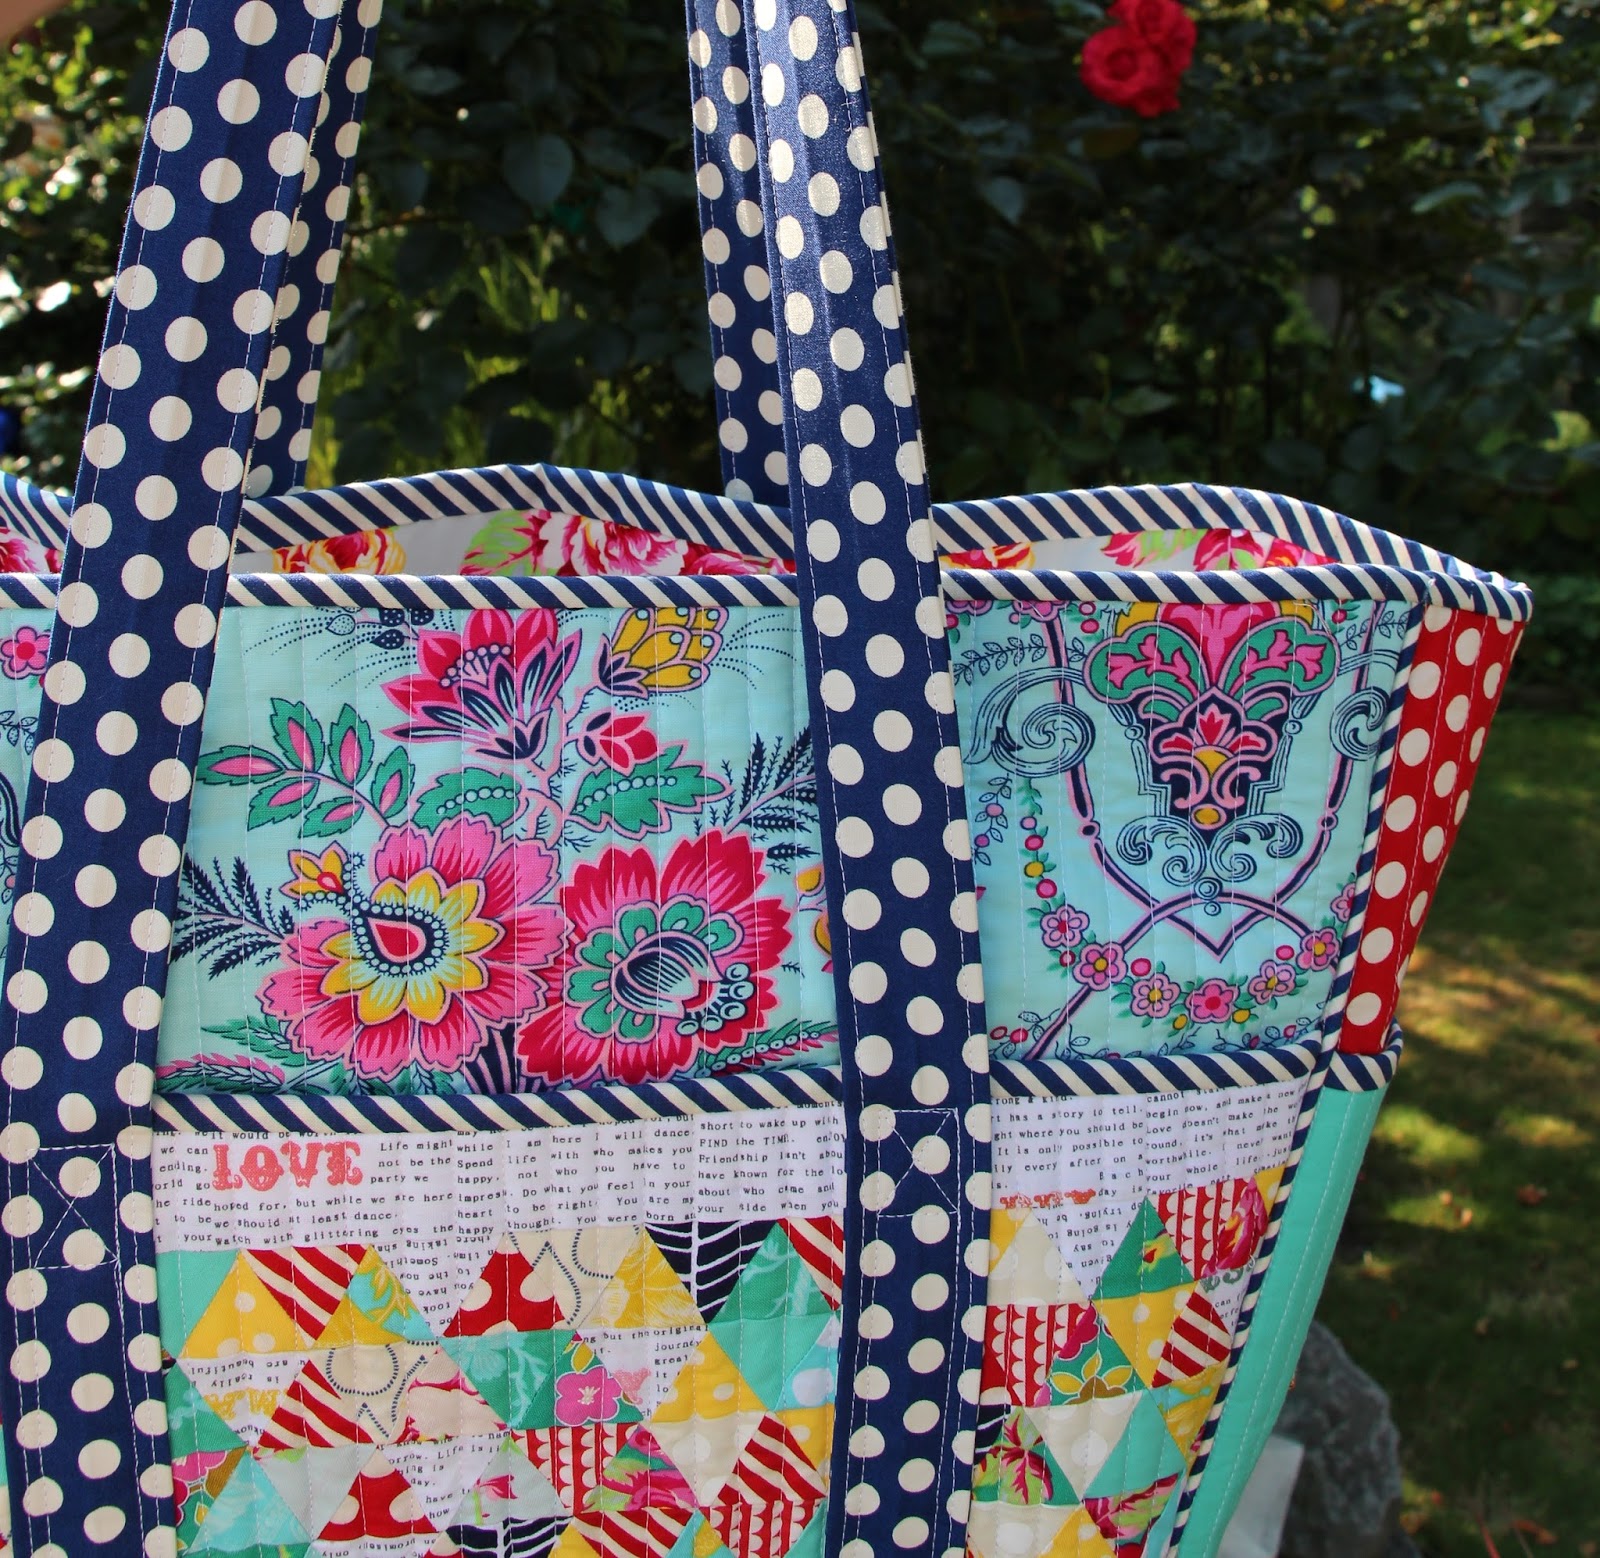
For this first side, I used equilateral triangle piecing. I'll be honest, I had no idea how difficult they were to piece and plan in terms of beginning size and finished size. But they worked out in the end, after a bit of creative thinking, and the addition of a print that would end up being my favorite part of the entire project (the Love Notes text print).


I chose to let this side focus on the fabric in all it's happy, floral gorgeousness.


The dominant fabric line in this bag is called "Lucky Girl" by Jennifer Paganelli. I used one of it's prints to line the pouch and included three pleated, and lined pockets on the inside. The top part of the pocket is elasticized to hold items securely.


Speaking of storage, this tote carries every essential thing I could possibly need for work, knitting, notepads, pencils, hexie bag and still contains room for the extra non-essentials like lunch, wallet, and sweater. :) (Priorities right??)


I used a new to me technique of using utility canvas as a stabilizer (as well as Pellon Shapeflex 101, and multiple layers of batting, depending on the piece). It adds SO much sturdiness. I can't believe the difference. This bag is SOLID. It can stand on it's own, empty or full. And I don't feel like if I look at it wrong, it's going to unravel on me. Some layers were half an inch thick during construction, and it was so worth it. 


In addition to the three inner pockets, there are four large pockets on the outside, perfect for a book or magazine, and my iphone, and all are easily accessible.This pocket is my favorite, incorporating a half-inch hexagon panel that I hand pieced. I can't tell you how much I love this pocket.

This is my new favorite size of hexagon. I foresee lots of hexagon lunch breaks. There may have been some fussy cutting involved, as a direct reminder of what is truly important.


Since this tote was a present for myself, I decided to make my first dresden plate block, which I absolutely love. And of course, there needed to be a healthy dose of aqua involved.   


I made the straps nice and wide, as well as comfortably long enough to easily throw over my shoulder. They contain four layers of fabric, one of interfacing and one of canvas.

For my photoshoot, I chose to visit one of my favorite happy places on earth - a family members garden. The morning sun and atmosphere was just perfect.


This challenge came at the most busy week of our summer. We had a visiting couple in our congregation, which meant we had the awesome privilege of having them for dinner, I am volunteering 30+ hours of my time to a worldwide education work, the kids are out of school, and we are house-hunting, packing, and I'm going to work full time in just over a week.

Several times in this challenge, I wondered if I would be physically able to finish this project. Would I be able to get the idea in my head out and into fabric. Should I have chosen to make something with a pattern already designed? Should I have made a smaller pattern? Did I bite off more than I could chew?

I literally didn't finish the project until late Saturday night, after a full afternoon and evening of sewing. It wasn't until partway through Saturday, that I realized it still had the hope of being a real bag and that I didn't have to show up empty handed. (Needless to say, I was shaking by this point, and there may have been some tears.) Happily, my hubby swooped in, managed the three kids and ordered take out. And in the end, I am so pleased that the design I made, and implemented is almost exactly what was in my head and my sketch book when I started. I definitely learned some new techniques with this challenge, and it had so many firsts for me.

It's a recurring habit of mine to seriously overbook myself, but boy did it feel good on Sunday afternoon when everything was done, commitments met, photos taken, and I could snuggle my baby, without the panic that I was not doing something I needed to do THAT EXACT MOMENT. Thankfully, the busy is mostly over and I can breathe again. (That being said, I now need to clean all the things... as housecleaning was not top of the list the last week or two.)
 

I want to thank everyone that voted for my last project. I am so honored to be a part of such an awesome competition with such talented people. I am also unbelievably floored that I received so much love from the public for my last project. You literally carried me into round two. THANK YOU!

It would means so much to me if you would be able to take a minute and swing by Rach at Family Ever After's blog and vote for your favorite bag (and if it happens to be mine, yay!!).
I am really wanting to be able to progress to the next challenge (I have plans...), and EVERY single vote counts. If you happened to look at the results chart from the last challenge (link is at the top of this post), you will see what I mean. You can vote here.


Thank you for stopping by!

xo,
Jade


Monday, August 11, 2014

sink or swim - Sewvivor - Challenge #1

Two weeks ago, I was ecstatic to discover that I was selected to be one of 16 contestants participating in this years "Sewvivor" competition. Its such an honor and my fellow competitors are all amazingly talented. Today we get to reveal our first challenge and I can't wait to see what everyone's been working on. I barely slept last night in anticipation. The theme for Challenge 1 is something (anything) nautical.

sink or swim
  1. fail or succeed entirely by one's own efforts.


For this nautical challenge, I used Tula Pink's Anchor's Aweigh pattern. I have wanted to make this pattern since I first saw it, but couldn't see quilting the full size pattern in enough time. I adjusted the pattern size and scaled it down by one third. It measures about 60 x 64 inches. Using a gradient of warm greys to creamy whites, against a aqua and white striped background really made the quilt for me. This one is my baby... the second quilt I've ever made just for me.


This quilt was definitely a challenge. It has more than 700 pieces and each of the background pieces required individual recalculation. I spent a couple hours with my calculator before ever cutting anything out, and the piecing took hours. I built a portable flat design board to hold the pieces for each part of each row in order to make piecing easier. The pattern is very well written, which definitely helped. I couldn't be more pleased with how it turned out.


For quilting, I was planning on doing concentric spirals, but, long story short, this was nothing short of a disaster, and I ended up unpicking one whole spiral, and making the spiral quilting cover the whole top. It may be predictable, but spiral quilting is still one of my favorite textures in a quilt.


I did a simple backing with a gradient of the anchor colors pieced in. It breaks up the turquoise nicely and definitely draws your eye upwards.


My family and I couldn't have picked a better day for a photo shoot. We wandered around a small, local sea town, dodging tourists and ice cream cones and managed to find the coolest picture ideas. It was such a fun day and I'm so glad my family was able to share it with me. 


I've named this quilt "sink or swim" as the definition is to "fail or succeed entirely by one's own efforts". I ran into some pretty huge road blocks with this project, but was able to recover and in the end, whatever happens, whether I make it to the next round or not, I'll know that I "succeeded" - this is definitely a quilt that I will proudly stand behind and cherish for years to come.

Of the sixteen amazing contestants, only ten will be proceeding to the next round (I really, really want to make it through!), following a voting process where 50% of the vote is by selected judges, and 50% is by the public (that's you!). I cannot believe what an awesome experience this has been - my fellow contestants are incredibly supportive, funny, talented and I'm definitely proud to be a part of this group for as long as possible.

Rach, our amazing competition organizer, at Family Ever After has all 16 projects on her blog and if you like, you can vote for your favorite over there. The voting is only open until Wednesday, so head on over. :) Thank you for your support and for stopping by!

xo,
Jade

Wednesday, July 30, 2014

a stitchy update

First of all, I want to thank everyone for stopping by last week and leaving lovely comments on my Sewvivor audition. I am humbled and amazed to report that I made it in as a contestant in the top 16. To be quite honest, I didn't think I was going to make it, as the competition is quite fierce. I've come to the conclusion that the next little while will be fueled by coffee, adrenaline and very little sleep. I'll keep you posted on how things go. You can also follow along over at Family Ever After.

In other stitchy news, I've been bitten. I held off for so long, but my Instagramming crafty friend, M, of Three Owls finally convinced me to take the plunge into the hexie (hexy??) world. And I finally quelled the fear and did it. And guess what? I'm hooked.


I can't get over how satisfying hexagons are! Also, I love the hand-sewing aspect. Take three minutes of basting and you get a little instant shot of cuteness.
I suspect you'll be seeing more of these in the months to come.

A few things I've learned:


1. I love thread basting. I can't imagine using glue, but will try it when I get the appropriate glue for educations sake.

2. Take small bites if you don't want your threads to show through on the top of the hexagon.

my first hexagon flower - see the little stitches?

3. Using enough thread tension (pulling stitches nice and tight) when stitching the hexagons together also helps reduce thread showing through the top.

Less little stiches showing...

4. I need a bigger pouch/organizer. Someone said I'd giggle once I was hooked that I initially thought this pouch would suffice. They were right. :)


And that's it for now friends. Thank you for stopping by. I'm off to go tackle my ridiculously long crafty to do list.

xo
Jade

Thursday, July 24, 2014

he loves me - a finished challenge quilt

In true typical me fashion, I managed to finish my quilt for the Michael Miller Petal Pinwheels Challenge hosted by the Modern Quilt Guild just in time. Just.


The idea for this quilt came to me while up with my youngest in the middle of the night. It's one of those flash ideas I seem to get, and I have to write it down or I forget it. I love these kinds of inspiration moments. Even if it means being up at three and four AM.

I'm pretty sure we've all heard of the game girls play while pulling petals off a daisy or flower. He loves me, he loves me not.... he loves me (if you're lucky). The fabrics for the challenge reminded me of this game. And I really wanted to create the feel of petals falling. If you counted there are exactly twenty-one petals (some species of daisies have this number), and "he loves me" was born.


The background is nice solid gray from Kona. I've included a few petals of other solid varieties and have used a shot cotton for the grass and stem. The only pieced item in this whole quilt is the stem and background. Everything else was "appliqued". I use this phrase lightly because I'm not sure what I did can really be called applique, so much as flying by the seat of my pants and hoping it turns out ok.


I did buy some thermoweb with the intention of doing real applique, but in the end, I decided I really didn't want a "polished" look to the finish. I wanted it raw and thready and organic. Needle-turned would be too perfect, and interfacing would be too chunky. So, after hand cutting the petals, I used a fabric glue stick, positioned them, tacked them down, and sewed over top with my quilting stitch once everything was all layered together. The matchstick quilting served as my applique process. Even the grass was glued down. I'm not sure if this is lazy or creative, but it fit my end goal and the quilt isn't too thick or stiff. I am really pleased with how it turned out.


I used several Aurifil threads to do the quilting, both light and dark gray, some black and white and a gorgeous variegated yellow. Before binding, I added a bit of hand embroidery (for those taking notes, hand-stitching over top of matchstick quilting is somewhat tricky but doable).

I love this effect.


A little creative binding, and we're done. It measeures 20.25" x 14.5".
I'm so happy with the way this turned out.


Thank you for stopping by today!

Linking up for finish it up Friday over at Crazy Mom Quilts.

Jade


Monday, July 21, 2014

Sewvivor - Stitch Mischief

This has been an epic year of crafting for me and I'm really excited and really nervous about this post. I've decided to enter the "Sewvivor - Quiters Edition", hosted by Rach at Family Ever After.


I've mulled it over and was really torn between several finishes in the past six months. I've finally narrowed it to my 'up, up and away' quilt (it just narrowly beat out gravity).


This is a very special quilt to me. It is my youngest's first big boy quilt, my first ever challenge quilt for the Modern Quilt Guild, and the first pattern that I've ever drafted from scratch and made. It's the quilt that made me begin to think I might, maybe, just maybe, have a shot of entering the quilt design and pattern making world.


The base fabric is a grey from Moda. I love the design so much as it is so scrap friendly, and it is so simple and yet striking. I love the way the splashes of color pop against the gray. I backed it in a bright and cheery yellow polka dot from Riley Blake. I'm pretty much a fan of anything polka dotted, but sunny yellow ones are the best. (And red. Always red. But I digress.)


I think this is also my first truly "modern" quilt. As I find my way in the quilting world, I'm learning that at heart, I seem to lean towards the modern with a happy helping of traditional mixed in.


I quilted it in a spiral - it adds so much movement and texture to the quilt. While it does take a long time, the effort is worth it. And it makes me want to quilt everything in a spiraling pattern.


From the time this quilt was finished and bound (and even before), it has been loved by my son. He sleeps with it every night, and it sometimes makes the occasional trip to the beach. It means SO much to me to that he likes it and that it's both artistic and functional.


And one of these days (as soon as I clone myself, or stay up all night), I'll move the pattern from my sketchbook to the digital world. I can't wait.


This quilt is defines what quilting is to me, it's the beginning and it's the future. I really hope you like it too!

Thank you for stopping by!

Jade